Real-time Watercolor Landscape Tutorial
Dec 07, 2022Today, I'm going to show you how to paint this simple landscape scene in watercolor.

We're going to talk about the major things that you need to know to make scenes like this paintable for you. And by the end of this, you're going to know what elements to concentrate on when painting your own landscape scenes.
How to Capture the Atmosphere of a Landscape
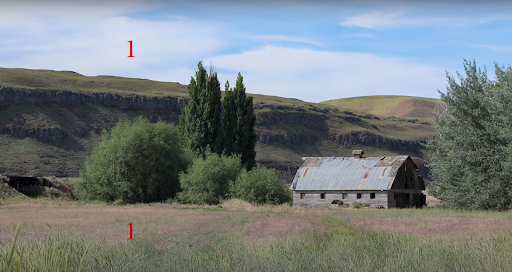
So the first thing that you need to think about is the large shapes of the scene. To help you understand this, look at this reference photo. I like to think of this painting as two major shapes:
- You have the sky and the ground that make up one shape.
- And then you have the massive trees and the hills in the distance as your second shape that is going to define the barn in this painting.

Layout Your Drawing from the Reference Photo
An important rule to keep in mind as you sketch your scene is to compose the most key elements of the scene on one of the thirds of your painting. To determine this, you can lay a simple tic tac toe grid on top of your painting.
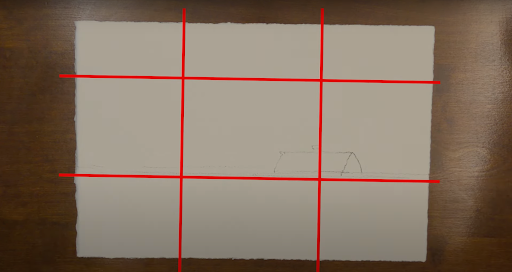
Where these lines intersect is where you want to compose the most interest in your scene. So, we want this barn to be at one of those intersections.
In the reference photo, we have these dark vertical trees. I'm going to move those and put them right here on this side of the barn so that it leads your eye into the scene and gives us a nice area of interest right here.
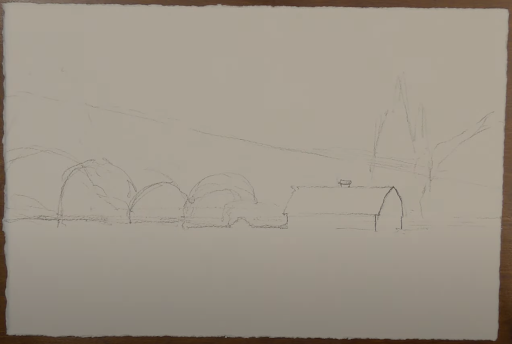
After we've composed the scene and done our drawing, then we get into the painting process.
Don’t Be Afraid of Painting Strong in the First Wash
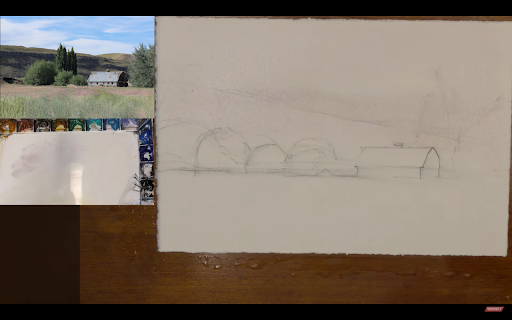
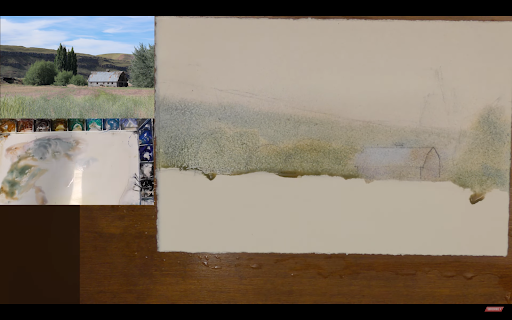
First, I'm going to wet down both sides of my paper and lay it flat on my surface. Now I'd like to wet down both sides because it gives me more time before the paper dries. That way I can paint wet in wet a little bit more. So while we wet down the back of the paper, make sure you’re not soaking it. Just get it nice and evenly wet. Do the same thing on the front. Don’t worry about skipping over anything, just wet down the whole paper.
Okay, so now let's start to paint.
I'm going to use a large mop brush to start things off and think about the lightest values in this scene - for instance, the color of the clouds. I want a little bit of warmth here.
I mix Raw Sienna, Rose Matter Permanent, a touch of Lavender, and some Cerulean.
Really, I am just kind of fiddling around until I come up with a nice pale gray that leans a little bit warm. Then, I'm going to just cover the paper with that. I'm going to come back in a minute and paint some clouds over those areas.
Now I want to think about the color of this barn. I rinse my brush off and make this cooler color. I mix in some Cerulean to what I already have mixed up.
The temptation is to go really light on this wash because we don't have anything to compare it to other than the white of the paper. But don't be afraid to paint strong in this first wash, especially when we get down into this area. What I'm laying in now is the color of the barn that I'm going to paint around in the next phase.

Here's a little touch of some rust in there, some other colors. You know, this is the fun part of the painting where we can just let these colors kind of flow together, melt together, you know? Let's take advantage of that.
Okay, my sky is still damp. I'm going to come right back to that in a minute. But what I want to do now is mix up some green to use for some of these trees.
I mix Raw Sienna and Cobalt Turquoise to create green and I'm also going to mix in some of what I already have on my palette. Remember that it's all going to be so much darker when we go back in and paint over it one more time.
This is a fun part of the painting process where we can let these colors just blend in together.
Now, we are down to the ground plain with our lightest values, so we’re going to pause on the trees for a minute.
Vary Your Brushstrokes
For the sky, I'm going to pick a brush that's just a little smaller - another round brush that still gives me plenty of control and I need to finish up the sky.

I am going to mix some Cerulean, Cobalt blue, and a touch of Cobalt Teal Blue. I'm using a little more paint and a little less water than what I've been using up to this point. If you don't have all these colors, don't worry. You’re just going for a rich blue color to create some of the sweeping effects of the sky here.
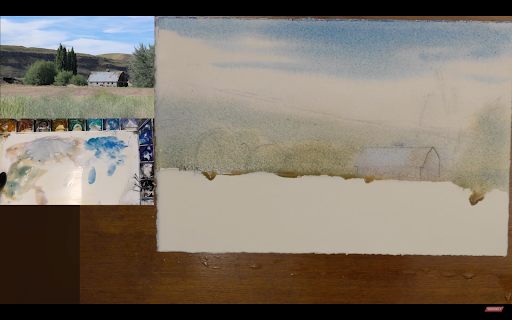
I'm negatively painting the white parts of the cloud, which means I'm painting around the clouds to define them. This is a very important watercolor skill.
One thing we know about skies is that, typically up towards the top of the sky, the color is a little richer. Your strongest blue can be up here. I am also thinking about using different brushstrokes, avoiding the same ones over and over and over.
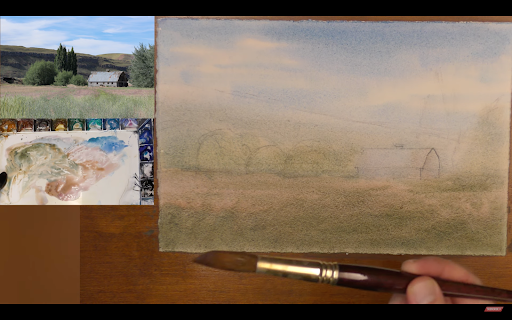
Next up, turn your brush to a different kind of mark and just let it blend right into these light values of the hill. Now that we've done that, we're going to move into the foreground. Since the paper is still damp, I can work from this nice wet edge.
On this part of the painting, I am going to use a lot of paint to compensate for the drying and fading that's going to happen. Okay, let's use Rose Matter Permanent, Lavender, Raw Sienna and mix it in with some of this pigment that I have on my palette to neutralize it a bit.
Here's something to remember. We want our brush strokes to be smaller and more together the further they get into our scene. So the perspective of brush strokes is important. When you get closer to the foreground, you want bigger brush strokes.
Also use a little more strength as you get down to the foreground. When I say strength, I mean more paint, stronger paint, and less water.

What I'm going to do now is switch into some of this green, mixing some more Cobalt Turquoise into what we already have.
All right. We reach the foreground here. A little more strength, more paint. Raw Sienna into Cobalt Turquoise. Now, I'm just thinking about some subtle effects to add a little more interest to this foreground until we just leave it alone. The soft little transitions can just imply that there's texture in the grass.
Let's review what we did in this first wash:
- We covered the entire paper with the lightest values of the scene.
- We painted the sky, laid in the light values for our barn, hinted at some of the values for this hill.
- And then we painted the foreground.

Paint the Large Shape of the Scene
In this next phase, we're going to paint our large hill, move right into these trees, and connect that in with the shadow side of the barn, thinking about the large shapes of the scene and connecting all of this into one big shape.
So what we want to do first is we want to go ahead and premix a few colors that we're going to need. All right. I'm going to use a medium size brush - the smaller soft brush in this phase of the painting.
What I like to do is premix a few different colors so I don't have to think about that as much while I'm painting.
I want a good amount of base green.
I want to add a bit of Lavender to use as the hill moves into the background to make it recede.
I'm going to start on the left side of my paper and work across the scene.
I don't want to overthink this too much, but as I go across the scene, there are a few little changes in shape to the hill. Just make sure it's not just one straight line. Also, as the hill comes down, it gets a little darker.
I'm going to cool down a little bit as we kind of get to the distance, so this hill kind of recedes into the distance. I'm going to mix up a little bit warmer of a green, with Raw Sienna and a touch of Cadmium Yellow to give me a slightly different shade of green on a few of these trees, letting all that merge wet and wet. I want them to melt and connect right into this background shape.
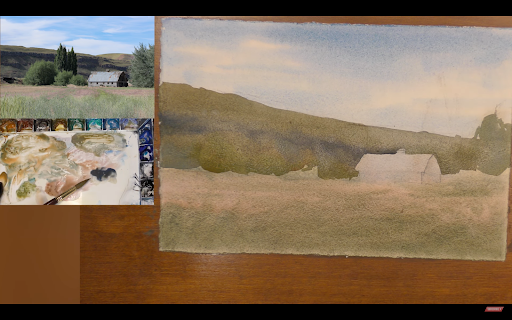
All right, let's focus on the barn now. I had to change the look of it just a little bit because I painted over some of it that I didn't want to. But that's okay. That's part of watercolor. There are going to be mistakes along the way. At this point, I'm kind of ignoring my drawing. I'm just correcting it a little.
Now, I’ll go right into the shadow side of that barn while this is wet and let it merge.
I'm using some Lavender and letting that just merge with the background. We're establishing the shape of the barn by painting around it. It's a little dark on the right side, the shadow.
All right, while this is still damp, let's think about this tree and focus on making some of the other darks merge while this is still damp. A few darks will bring this area forward.
I mix some thicker green paint with Umber, Burnt Sienna - some of my earth tones - with Cobalt Turquoise. I keep the brushstrokes pretty clean and simple. And notice that I've simplified the two trees in the reference photo into one.
As we progress in the painting, we will go to smaller and smaller brushes. Now I'm using a smaller, pointy brush so I can get some fine little details.
Another thing to consider is at this point, this thicker wash is still kind of wet, so you have an opportunity to go in and scrape a little bit while this is still damp. If there's any places you want to put a little bit more texture, some lighter colored branches, you know, we can scratch a few of those now. This t gives a little more texture to the middle ground and pushes the background a little further back.
Okay. So now I take the smaller brush and paint the windows. I use Payne’s Gray and a little bit of Lavender.
At this stage, I like to bring in a little piece of scrap paper so I can see what kind of mark I’m trying to make. I'm going to take a bigger brush and load it up with a little bit of green - Raw Sienna and Cobalt Turquoise. I just want to put a few little marks to add a little bit of texture in the foreground here. Just give it a little bit of texture with some clean brush marks. This does a few things for our painting: it darkens the foreground, leads our eyes deeper into the scene, and it also gives the foreground a little bit more texture and a little bit more interest. This all helps create a sense of depth.
I'm going to go back to my palette knife to add a few little scratches. This just adds a little bit of texture.
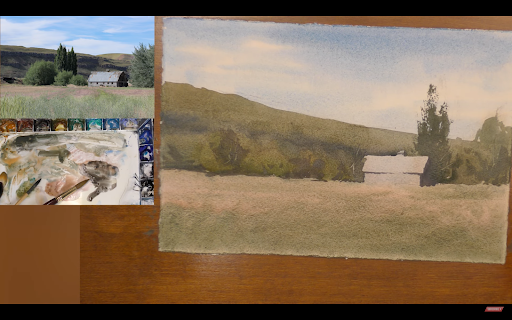
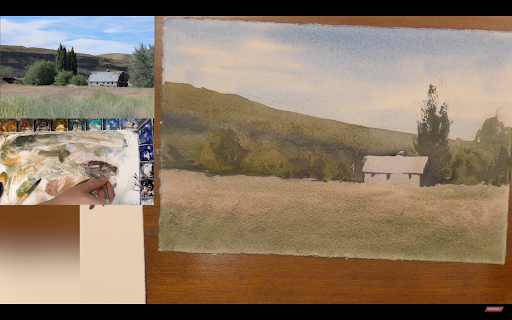
Final Touches

When you get your painting to about 90%, take a step back and assess it. Take your time, maybe come back to it a few hours later. As I look at this painting, we're nearly there, but there are a couple things I want to add.
The first thing is, I want to add little more texture onto this barn. For this, I'm going to use a smaller, pointier brush, and I'm going to use the side of the brush to get a little bit of texture.
I'm just using a little bit of some of this mixture I have on my palette that looks gray. And you see, if I use my brush sideways, I can get a little bit of that texture on the paper. That's what I'm going for here. So feel free to use some scrap paper, get out the excess moisture until you're making nice little broken dry marks.

And then I want to come up to the barn and just add a little bit of texture to define the roof. The next thing I want to do is put a little bit more texture on the side of the barn. So I'm going to do the same thing here. There are a couple little darker marks on the rough and we put a few of those.
The last thing I want to do is put a few birds in the sky. And for that I'm going to use this little Signwriters brush. I get a lot of questions about this one. It's called Custom Shop LL-00, and you can find it on Amazon. You can use that or a bigger brush - anything with a fine point.

You want thicker paint on this. For birds, I don't want a lot of detail. Just a little mark. And when you're painting birds, you don't want them all to be the same size all go in the same direction. We really want to avoid patterns. Just a few little dots. And let's go ahead and leave it at that. It's really easy to overdo these little touches.
We have a good impression of the scene now. I didn't quite get the angle on this barn exactly how I wanted to do it, but I did capture the essence of the scene of this lonely building in this wide open landscape.

We were able to accomplish this by really thinking through the large shapes, the scene, and the values of the scene. I hope that you found this demonstration helpful today! If we can think about these concepts as we go into painting landscape scenes, it's really going to help us simplify the scenes and create stronger paintings.
Pigments Used:
Burnt Sienna
Cadmium Red
Cerulean Blue
Cobalt Blue
Cobalt Teal Blue
Cobalt Turquoise
Lavender
Neutral Tint
Payne's Gray
Quinacridone Gold
Raw Sienna
Raw Sienna Light
Raw Umber
Rose Madder Permanent
Ultramarine Blue
Brushes Used:
Large Mop
Medium Round
Small Synthetic
Rigger
If you would like to purchase some of the brushes I feature in this video you can follow my Amazon Affiliate link: https://www.amazon.com/shop/m.white.art
